Diy galvanometer |design your own galvanometer

diy galvanometer | Design your own galvanometer
Diy galvanometer, design your own galvanometer. In this activity you made galvanometer.In this activity you will learn simple construction of galvanometer. Try more winding in the coil, fewer winding in the coil, Try placing in the directional compass within the coil instead of a suspended needle on the thread. What other variables can you think of to change it and perhaps make it better or easier to use?
Material Needed for diy galvanometer | Design your own galvanometer
- 10m (11 yds.) of 24-gauge insulated copper wire stripped at both ends.
- Three 10-cm (4-in.) lengths of wire.
- One 30-cm (12-in.) lengths of wire.
- Sewing needle.
- One 20-cm (8-in.) strip of wood lath.
- Lantern battery.
- Paper clip.
- Bar magnet.
Procedure:
- Make a coil with your long piece of wire by winding it around a lantern battery or small fruit jar. Leave about 50 cm (20 in.) of wire at each end.
- Remove the coil from the battery and use the 10 cm (4 in.) pieces of wire to hold the coil together in three places.
- Use the 30 cm (12-in.) wire to secure the coil in an upright position on the lath.
- Magnetize the needle by rubbing it 30 time in the same direction with a bar magnet. It should now pick up a paper clip.
- Use thread to hang the needle balanced in the middle of the coil. Compare your finished product with figure 8.16-1.
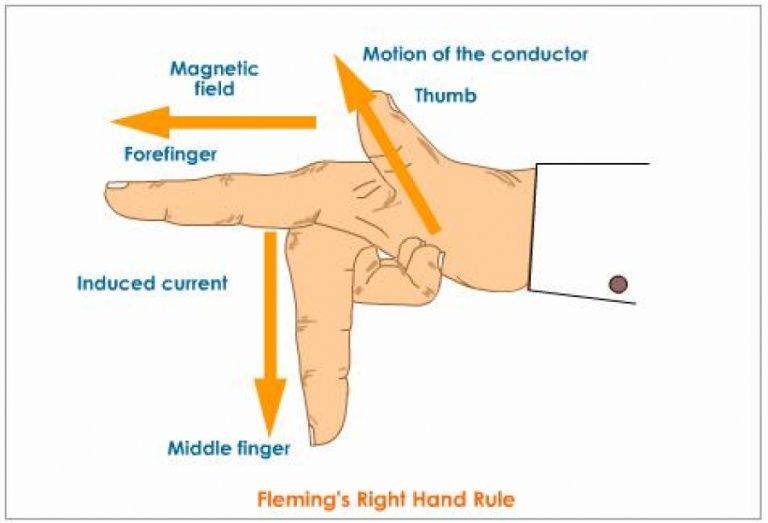
- We have learned that electric current flowing through a created a magnetic field around the wire. We found that when the wire is coiled, the magnetic field is stronger. The needle is a magnet. If an electric current flows through the coil of wire, what do you predict will happen to the needle?
- Touch the bare ends of your coil of wire to the dry cell. Was your prediction correct?
- This is a simple galvanometer used to detect the direction and flow the electric current. Touch the wire to a battery and notice the direction the needle point. Now, switch the wire on the terminal of the battery and notice the direction of the needle point. This device can be used to detect the flow of even small amounts of electric current.
Teacher guide:
Ideally, each child should construct a galvanometer. Group of three or four students working on one galvanometer, should to maximum. If a student is able to construct, explain, and predict the behavior of a galvanometer, it will indicate that he or she understand same of the important ideas about magnetism and electricity.
Your problem solver will substituted a directional compass for the suspended needle. Very thin insulated wire is best for this activity in order to provide many windings without excessive bulk. The more windings the galvanometer has, the more sensitive it will be to small amount of current electricity.
SKILLS:
Observing, inferring, communicating, comparing and contrasting, formulating hypotheses, identifying and controlling variables, experiment.


One Comment