Part 2 Make Your Own Water Rocket
 |
| Part 2 Make Your Own Water Rocket |
The water rocket body to be introduced in this article will be a basic type that can be made using readily available materials; this type achieves a balance between safety and functionality. We suggest that you begin by building a water rocket following the process suggested here so that your students can learn the basics of rocket making. After they have mastered the basic design, you can encourage your students to exert their ingenuity in the pursuit of new designs.
What you will need
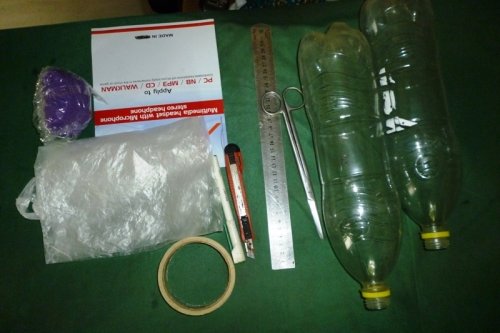
Assemble the necessary materials and tools and run through the checklist before starting your class/workshop.
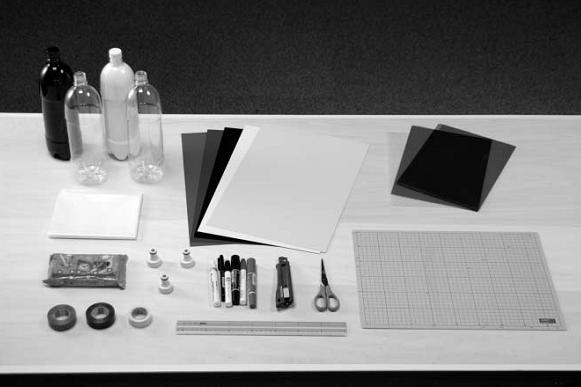 |
| Add caption |
2 PET bottles PVC sheet ,File holder (Clear file), Vinyl bag (trash bag) , Modeling clay , Nozzle , Permanent magic marker (oil base) , Cutter , Scissors , Cutting mat , Vinyl tape, Scale
Water rocket building process
1. Making fins
 |
| Cutting out fin patterns Various shapes of fins can be made in height and width. Let’s make 4 fins of the pattern at left. |
|
 |
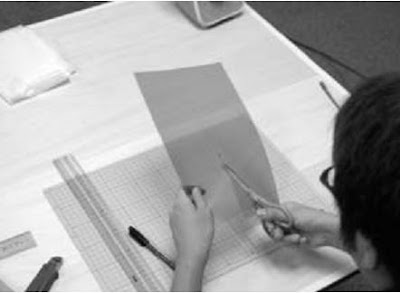
| Using a permanent magic marker, draw fin pattern guidelines on a plastic sheet as shown in the illus-tration at left, then carefully cut out the patterns fol-lowing the guidelines. |
2 Preparing the fin base
 |
| Add caption |
 |
| Bend the anchors to the left and right by aligning the ruler. |
Divide the base of each fin into four equal parts by drawing and then cutting three guidelines. Alternately bend the anchors to the left and right. You can ensure a straight bend by aligning the ruler along the baseline. Repeat this process for each one of the four fins.
 |
| Make 4 fins in the same manner |
3.Making the skirt and attaching it to the rocket body
 |
| Cutting out the skirt section from a file holder (clear file) |
Cut the clear file into a rectangular shape :The width : Wrap the clear file around the pet bottle and add a few centimeters to overlap at the leading edge.The length : Wrap the sheet around the pet bottle and adjust its length so that the cylinder is slightly longer than the bottle’s mouth.
 |
| Wrapping the skirt material around the rocket body |
Having cut out the skirt, wrap it around the rocket body and use a magic marker to mark the position
where the two edges overlap.
4. Dividing it into four equal parts and making creases
Spread the rectangle flat again and divide it into four equal parts, using the previously marked line as a reference point. First fold the sheet into halves, then fold each half into quarters. Mark each quarter and make creases.
 |
| Dividing it into four equal parts and making creases |
5. Making cuts along the creases and marked line
Make cuts along the creases and the marked line to divide the rectangle into four equal parts.
 |
| Making cuts along the creases and marked line |
6. Attaching the fins
Insert the fins one by one into the skirt, then tape the slots securely from the reverse side of the skirt.
 |
| Attaching the fins |
 |
| Attach the fines to the skirt |
7. Affixing the skirt to the rocket body
Wrap the skirt around the rocket body and fasten its starting edge with vinyl tape, then use more tape to firmly fix the skirt at its leading edge Check to see the skirt is fixed in the right position Check the skirt position to ensure that it extends beyond the end of the PET bottle’s mouth.
 |
| Affixing the skirt to the rocket body |
Making the nose cone
1 Marking the other bottle with cut guides
The second bottle is used to make the nose cone. Use the permanent magic marker to mark cut guide-lines for the part that will become the nose cone.
 |
| Marking the other bottle with cut guides |
2. Making partial cuts with a cutter
As shown in the photo, use the cutter to make partial cuts into each guideline. This is a safe way to open gaps for the use of scissors.
 |
| Making partial cuts with a cutter |
3. Cutting along the guidelines
Use the scissors to cut off the nose cone. We have found that it is easier to remove the part near the bottle cap first.
 |
| Cutting along the guidelines |
4. Attaching the nose cone
Weigh out about 50 grams of modeling clay and apply it to the bottom of the rocket’s body
 |
| Attaching the nose cone |
5. Determine the center of gravity
Place the rocket on your forefinger to determine the center of gravity. The center of gravity should be closer to the nose cone and not the actual physical center of the PET bottle.

 |
| Determine the center of gravity |
6. Attaching the nose cone
 |
| Attaching the nose cone |
Push the nose cone over the rocket body and tape it securely into place.
7. Putting the vinyl bag into the nose cone
The vinyl bag acts as a cushion inside the nose cone. Unfold the vinyl bag and stuff it loosely into the nose cone.
 |
| Putting the vinyl bag into the nose cone |
 |
| Sealing the nose cone |
Prepare 10 to 15 strips of vinyl tape of a uniform length and use them to seal the nose cone opening.
Final check
The final step is to check the rocket thoroughly to ensure that it is not warped or otherwise damaged, and that all parts are firmly fixed. Attach the nozzle and check the length of the skirt if the top of the nozzle protrudes slightly from the skirt.
 |
Final check
|
Watch Video Part Two Construction of Water Rocket
https://www.youtube.com/watch?v=6X8abVd8GRM